
Ok, I’m sold on trying to use AI to write pure C#, but why not have it develop an add-in directly? Why should I build a Revit macro at all?
It is a valid question. Add-ins are undeniably the gold standard for deploying scalable tools in Revit (yes, even better than Dynamo Player in most cases). They give you custom ribbon panels, dockable panes, and advanced UI capabilities. But if your goal is rapid automation and getting things done today, going straight to Add-in development introduces a massive roadblock: the compilation and debugging loop.
Why are Revit macros the superior vehicle for AI-assisted automation?
When you develop a traditional Revit Add-in in Visual Studio, your code compiles into a .dll file that Revit loads into its memory space upon startup. Because Revit aggressively locks these loaded .dll files, you cannot overwrite them while the application is running.

- Close Revit entirely.
- Edit the C# code.
- Rebuild the solution.
- Launch Revit (which can easily take a minute or two).
- Open your
.rvttest model (which often takes another minute or two). - Run the command to see if the fix worked.
If the fix didn’t work? Return to step #1 and do it all over again.
While experienced developers use workarounds to bypass this development workflow, setting up those environments requires advanced IDE configuration.
The Macro Advantage: Revit Macros Eliminate Half of the Steps.
The Macro Manager acts as a built-in development environment that executes your code directly within the current Revit instance. Think of it like Dynamo player, but without the visual scripting side.
When you use AI to write a macro, you are completely bypassing external IDEs and manifest files which reduces the process down to three steps. You simply:
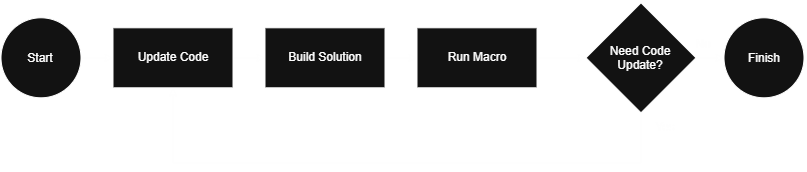
- Edit the C# code.
- Rebuild the solution.
- Run the macro.
If the code throws an exception or doesn’t behave exactly as you want, you don’t have to restart Revit. You just paste the error back to Claude, let it update the macro directly (no copy/pasting since you gave it access to the macro folder), and run it again instantly. Your iteration cycle drops from 5 minutes to 5 seconds.
By removing the friction of deployment and compilation, macros let you focus entirely on solving the architectural problem in front of you, turning AI into an on-demand, instant automation engine.
Tutorial: How to Use Claude (AI) + Revit Macros to Automate Revit
If you’ve never touched C# or opened the Revit Macro Manager, don’t panic. You aren’t going to be writing code today, you are just going to be managing it. We are going to use Claude Desktop to read the environment, write the code, and hand it back to us to compile.
Here is the exact step-by-step workflow for rapidly deploying AI-generated design automations within Revit, using macros rather than diving straight into building an addin.
Step 1: Create a Macro in Revit
First, we need to create the container for our code.
- Open Revit and navigate to the Manage tab.
- Click on Macro Manager (located on the far right).
- In the Macro Manager dialog, click on the Application tab. (Application-level macros can run in any Revit project you open, whereas Document-level macros are tied to the specific
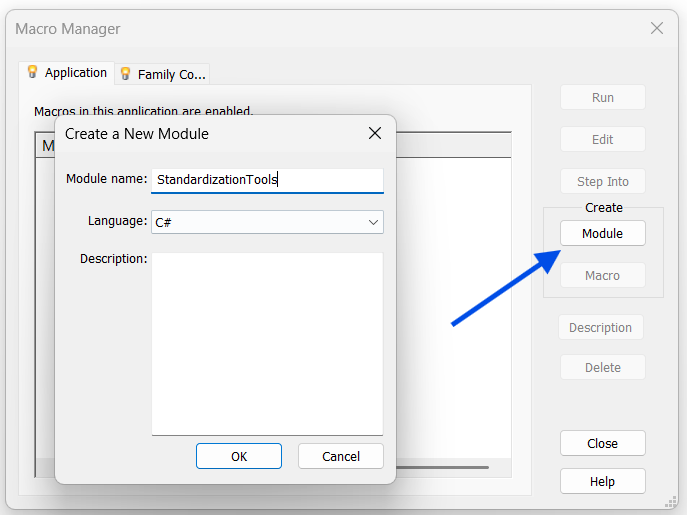
.rvtfile). - Click Create Module, name it
StandardizationTools, and set the language to C#. - Select your new module and click Create Macro. Name it something descriptive, like
CreateSheets.
Step 2: Open SharpDevelop and Find the Hidden Folder
When you created the macro, Revit automatically generated a template project and opened its built-in IDE (SharpDevelop for older Revit versions, or VS Code for newer ones).
Here is the secret to this workflow: Revit stores these macro files in a directory on your local drive. Once we find that folder, you can give Claude code permissions to read and write.
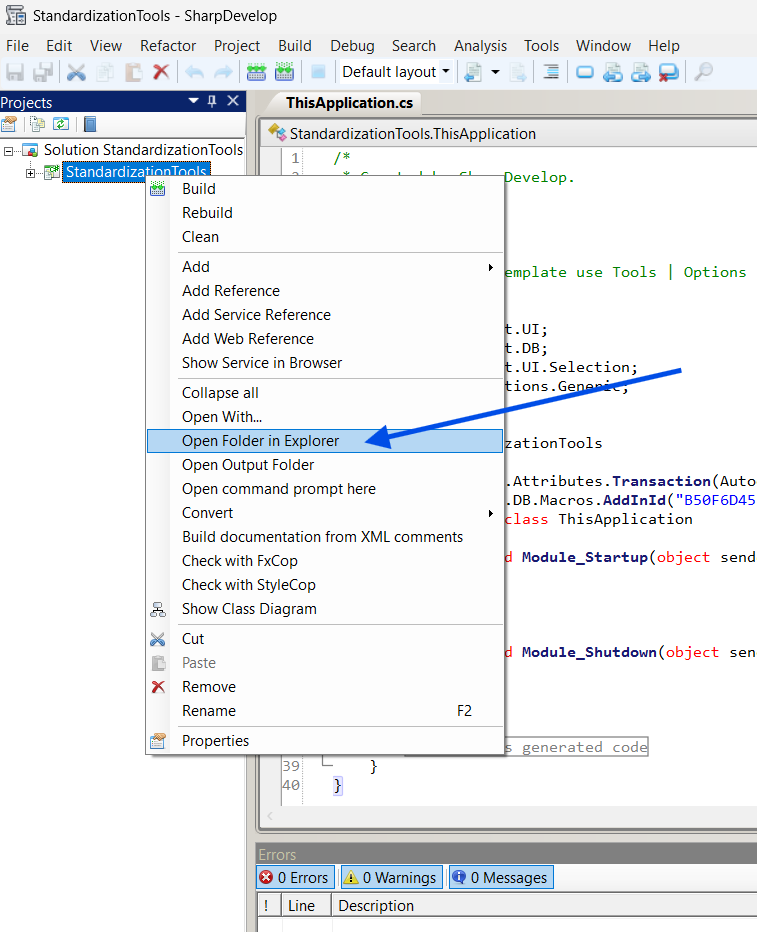
- In the SharpDevelop Project Explorer (usually on the left side of the screen), right-click your
StandardizationTools - Select Open Folder in Windows Explorer.
- This will open the folder which contains the
ThisApplication.csand other macros files, which is the space where Claude will be working directly.
In my example, I can see my csproj file is located in: C:\ProgramData\Autodesk\Revit\Macros\2024\Revit\AppHookup\StandardizationTools\Source\StandardizationTools
Step 3: Point Claude Desktop or Claude Code to Your Macro Folder
To get the best results from AI, we need to give it context. Instead of just pasting code back and forth between the LLM and SharpDevelop, we can use Claude’s ability to read and write local files.
- Open the Claude Desktop app.
- In the
Codesection of the app, point to the macro path found in the previous step by clicking the Add Folder icon above the chat text box. - By doing this, Claude can read the exact namespaces, class structures, and auto-generated boilerplate code that Revit requires. It knows exactly where to insert the new macro.
Step 4: Prompt Claude to Write the Macro
Now it’s time to let the AI do the heavy lifting. Write a prompt that explains exactly what you want to automate. Be as specific as possible about the Revit element types and the logic you need.
Example Prompt:
I am building a Revit 2024 macro in C#. I have the files for the macro module in this folder. Rewrite the
CreateSheets()to include the code for my macro as follows:
The macro should create sheets with the default title block family. Each sheet should be number A20x where the Level number from the model is x (e.g., A201 for Level 1). The sheet name should be “Architectural Plan – Level x” where x is the same number taken from the same level number that generated the sheet number. Do this for all Levels in the model.
Note that Claude will ask for permission to modify the code in this folder. Go ahead and click “Allow” to let Claude do its thing!
Claude will generate the complete C# code, perfectly formatted for your specific macro environment. Not a single line of code copy-and-pasted!
Step 5: Build and Run
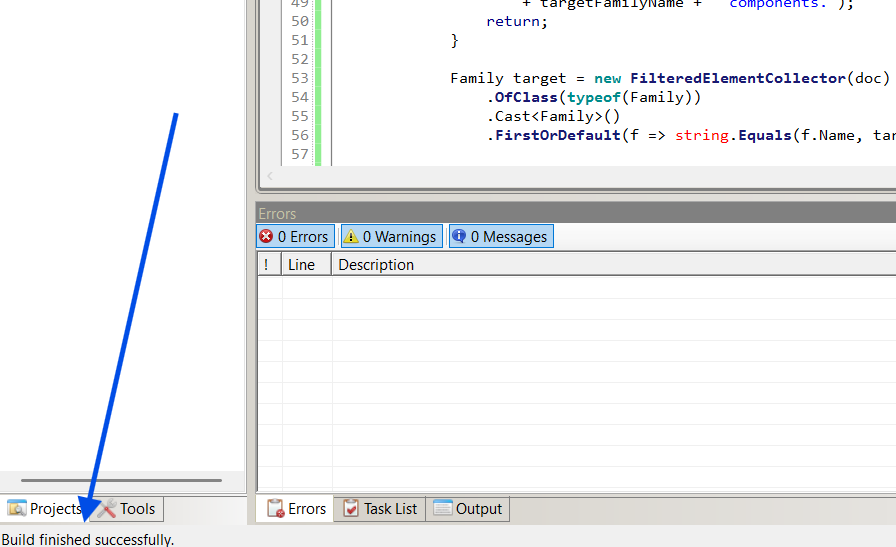
- Go back to SharpDevelop and press F8 (or go to Build > Build Solution) to compile the code. If you see “Build finished successfully” at the bottom of the screen, you are good to go.
- If you see any build failures, look at the output at the bottom of the screen and copy-and-paste the errors back to Claude. Claude will fix those errors (or attempt to). Once Claude confirms it’s fixed, try to build again. Repeat this step until the macro builds successfully.
- Switch back to Revit in the Revit Macro Manager and you will see your
GenerateHighRisemacro. Select it and hit Run.
If the Revit throws an error when running the macro, simply copy the error message from Revit (you can even take a screenshot!), paste it back into Claude Desktop, and ask for a fix. Hit F8, and try again until the macro is successful.
Thoughts?
I feel like Revit macros have been a long forgotten feature within Revit over the last several years (especially with the birth of Dynamo). Now, with the recent explosion of AI as a coding copilot, the barrier-to-entry of writing code for macros has dropped. Does that mean Revit macros are more efficient than Dynamo?
Leave a comment below and let us know your thoughts!
Coming Soon: Migrating Your Revit Macro To A Full Revit Add-in
Macros can be the ultimate prototyping sandbox because they have lightweight compilation overhead, you can build, test, and iterate on complex tools without closing and opening Revit between builds. But what happens when its time to share it with your team as a packaged Revit addin?
You translate it into a full-blown Revit Add-in. Yes, you use AI for that, too. Stay tuned for our next post which will step you through that workflow.
Leave a Reply